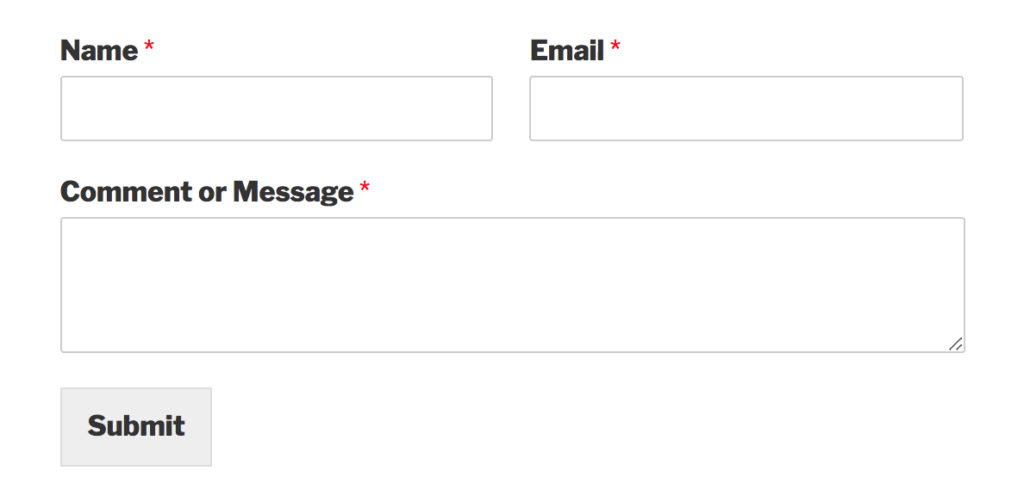
As a website developer, I often find myself needing two columns on a Contact Form 7 for myself and my clients. “How do you display a contact form with 2 or 3 columns?”. The main reason why you might want to do this is to show a name and email on the same row. Doing this will make the contact form look better, thus making a better user experience for your website or your client’s website. Do you want to display two or more columns on contact form 7? Many form plugins make it difficult to display two fields in one row. Both WPForms and Contact Form 7 allows you to do this fairly easily. If you want your contact form to look similar to the form below follow this post.
A quicker way of displaying two or more columns on a contact form | WP Forms
If you want a quick way of doing this WPForms is a quicker and easier route that doesn’t require any kind of code, follow the link here. This is the best way if you’re not familiar with Contact Form 7. Keep reading for a free way of showing two columns on a Contact Form 7.
Here are some related posts you might be interested in:
- Cheapest way to make a website
- Best WordPress Website Builder | Elementor
- Contact Form 7 not working: How to fix
- Must have free WordPress plugins of 2019
Contact Form 7, show fields side by side
How can you show two or more columns on contact form 7? If you are a WordPress developer then you would be used to Contact Form 7 and how it can be a little complex at times to achieve what seems to be a simple thing. If you know the right code, it’s actually fairly easy to achieve, I had to search high and low on the internet to find a solution. So here it is, nice and easy! Showing more than one field side by side requires a little bit of code knowledge but if you follow these steps you will get the results you are looking for.
Show columns side by side in contact form 7 with no code free
You only need a few plugins to do this. The two that you will need are Contact Form 7 Shortcode Enabler and Column Shortcodes, these are both completely free.
- If you don’t have it already download Contact Form 7 you can download it here https://en-gb.wordpress.org/plugins/contact-form-7/
- Download Contact Form 7 Shortcode Enabler https://wordpress.org/plugins/contact-form-7-shortcode-enabler/
- Download Column Shortcodes https://wordpress.org/plugins/column-shortcodes/
- Then you just need to use some code in your contact form builder. You can use the code below as an example, please feel free to copy and paste this onto your site.
<div class="content-column one_half"><div style="padding:"0;"><label> Your Name (required)
    [text* your-name] </label></div></div>

<div class="content-column one_half last_column"><label> Your Email (required)
    [email* your-email] </label></div><div class="clear_column"></div>

<label> Your Message
    [textarea your-message] </label>

[submit "Send"]
Adding padding to 2 column contact form
You’ll notice after adding the required plugins as well as adding the code, your form will have the two columns you are looking for. However, there will be no gaps in each field, which is shown in the screenshot below. There is a simple way to fix this, you simply need to add some CSS to the website.
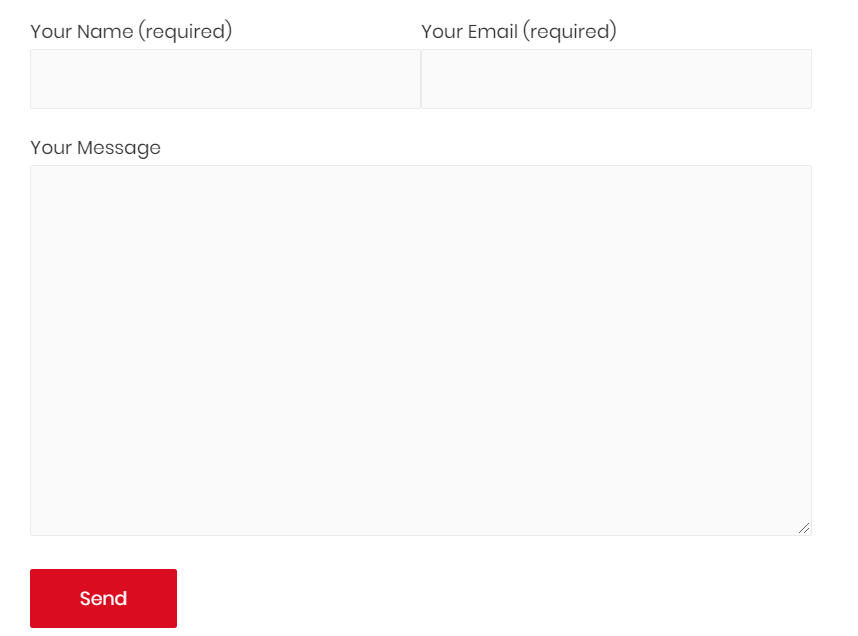
You can do this by clicking customise then clicking on Additional CSS and adding the following code. You might have a slightly different way of doing things when it comes to adding CSS, but this is the simplest way.
.content-column.one_half{
	padding-right: 10px;
}
How to show 3 columns on Contact form 7
Using the same technique as showing 2 columns on a contact form 7 you can also do this for 3. Using the following code you can easily display 3 columns on your contact form 7. The screenshot below shows the results of adding three columns on your contact form 7. This is useful if you want to add, name, email and phone number. It makes the form more compact so it enhances the user experience slightly. The code for this is shown further down.

To achieve this you just need a slight modification from your 2 column contact form code. It’s important that you use the classes in this code, and the plugin we added earlier (Shortcode Enabler) adds these classes for us. Make sure that you change the labels and names for your own use, this example shows Name, Email and Subject, you may not want the exact same fields in your contact form.
<div class="content-column one_third"><div style="padding:"0;"><label> Your Name (required)
    [text* your-name] </label></div></div>

<div class="content-column one_third"><div style="padding:"0;"><label> Your Email (required)
    [email* your-email] </label></div></div>

<div class="content-column one_third last_column"><label> Your Subject
     </label></div><div class="clear_column"></div>
How to show two columns on Contact Form 7 with no plugins
This is also fairly simple if you are comfortable with editing your functions.php file in your theme. This code replaces the need to have the plugin Contact Form 7 Shortcode Enabler. Before you do this make sure you do a full backup of your theme. To do this all you need to in your WordPress dashboard > Appearance then Theme Editor. Then click on Theme Functions or functions.php, copy and paste the code anywhere below the code “<?php” at the top. This will enable you to use Shortcodes without the need for plugins.
Adding this instead of the plugin is advantageous as having lots of plugins on your website can slow things down.
add_filter( 'wpcf7_form_elements', 'delicious_wpcf7_form_elements' );

function delicious_wpcf7_form_elements( $form ) {
$form = do_shortcode( $form );
return $form;
}
WPForms two-column contact form
If you wanted a quicker and easier way of doing this you can simply download WPForms here. It’s a very simple process and requires no code, as it’s built into the plugin.
Click on any field in the builder and then the Field Options screen. From here, open Advanced Options. Columns are configured using the CSS Classes setting.
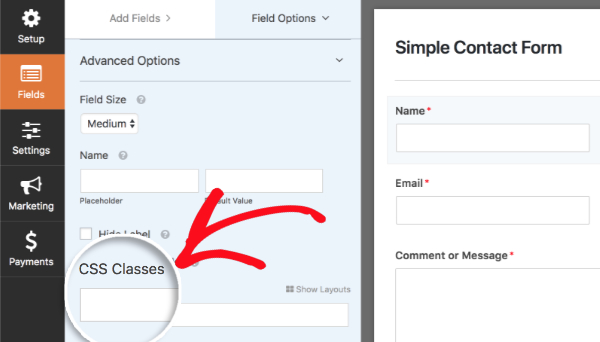
You can visually set the layout using the Show Layouts option on the right.
If you have for example Name and Email, you may want them to appear next to each other on one line. First, select the first field then choose the following option:
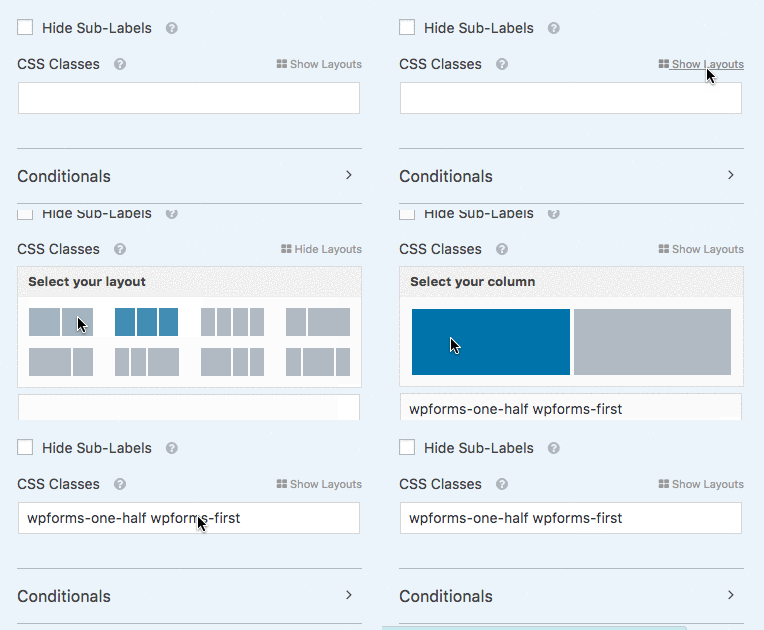
Once you have done that, select the second field and do the same but click the right layout option instead.
Following these instructions will add CSS to the fields so when you publish your form it will have the correct layout.

How to make a contact form with Elementor
If you don’t want to use Contact Form 7 or WP Forms, Elementor has a great built-in form builder. With the Elementor form element, you can easily add two or more columns to a contact form. You can even show up to 5 different fields to a row, it’s actually a lot easier than using Contact Form 7.
How to show 2 fields on one row with Elementor forms
It’s very easy to show more than one field in a row with Elementor. So just add the form element on Elementor, and navigate to the field you want to have more than one row on. Once you click on the field, you’ll then see Column Width, from here you can choose what percent you want that field to take up. If you choose 50% then it will take up half of the row. Click on the next row down on the list of fields, then choose 50% again on column width, you’ll then see these 2 fields fit on the same row.
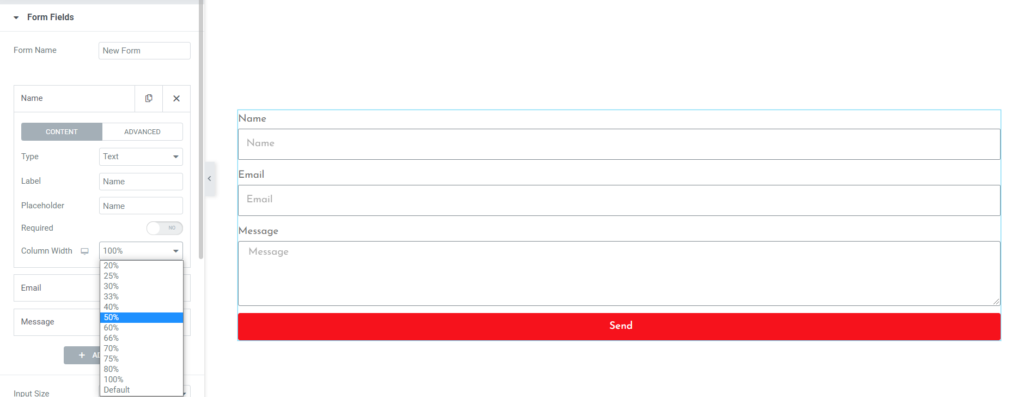
It’s as simple as that! The Elementor form element is super easy to use and it fits in perfectly with Elementor Pro. It’s just as good as WP Forms and Contact Form 7. There is a tonne of other features that you can use with form elements. One of my favorite features is the after-submission feature. This allows you to collect submissions internally on WordPress, email it to you, Mailchimp, or any other mail service. It’s massively flexible and all of these integrations are completely free and included with Elementor Pro.
Hopefully, you found this quick tutorial easy to follow and helped you solve this issue I had in the past. Please let me know if you have any issues I’ll try and get back to you as soon as I can.
