When making a website on WordPress that uses Advanced Custom Fields (ACF) you might find yourself needing a simple way for users to fill in a form which will then create a new post using ACF. For example, you make a custom post type and then create your custom fields using ACF, but you want the ACF posts to be user generated. How can you do this? When trying to find a solution for this on one of my projects, I found it very hard to find a solution online. Once I did, it was actually pretty easy to do, you just need the right tools.
Making custom post types
When you are making a WordPress website for yourself or a client you’ll often need to create a custom post type. For example, if you are making a website for a florist you may want to make the post type “flower type”. This will be useful if you are making it easier for the client to keep track of flowers and their various attributes. The easiest way of making a custom post type on WordPress is to download a free plugin called “Custom Post Type UI” which can be downloaded here.
This plugin allows you to make a new post type that will appear on the left of the dashboard simpler to “Post” and “Page” but it’s completely your own. It’s a very simple process just download the plugin and you’ll get a screen like this:

You can see above how it works, just name the Slug, in our example, it would be “Flower”, the Plural would be “Flowers”, and the Singular would be “Flower”. Then just press “Add Post Type” and that’s it.
From there you just need to create your ACF custom fields and you can set it to your new Post Type like in the image below. Just go to the custom fields section and scroll to the bottom, here you can set the post type.
Front-end generation of custom post types using ACF
Disclaimer here, this part isn’t completely free, I had to purchase a plugin, but it was very cheap and worth it! You don’t need to use any code or programming language, just a simple form. The way that I did it is using a plugin called “Fluent Forms Pro”, which only costs $35 annually (or £28). It’s worth noting that other form plugins allow you to do this, but many force you to buy the “Gold” or “Premium” version of the plugin, which costs a lot more. For example, WP Forms allows you to create ACF posts but you need the “Pro” version of the plugin which costs $159 a year. But Fluent Forms gives you all the features in the standard version. This came in handy because I also use the conditional logic feature which comes with it.
So once you have got Fluent Forms, and installed it onto your site, it’s a fairly easy process (once you know how to do it). The first thing you need to do is go onto the Integrations page and type in “Post/CPT Creation” this is the module you need to connect to ACF and create posts. Another useful module is User Registration, which allows you to create a form for users to register. Just toggle the button and it’ll be downloaded and activated.
Fluent Forms Post Creation
When you have done this, you need to create a new form. Click on “All Forms”, once you are on this page, click on the little arrow next to “Add new form”, then click on “Create Post Form”, from here you can select your custom post type. You can see in the example below, I am selecting the custom post type “order_tracking”, which is a custom post type that I’ve created.

Once you’ve done that you can set up the field types. If you are going to set up a form that relates to flowers then you need to make sure you are adding these fields in the form. However you don’t need to exactly match the custom fields, you can just do some, you don’t even need to name them the same. When you are ready you can start to link up each field with your custom fields.
Save your form, click on “Settings & Integrations” at the top, then “Post Feeds”. Once you are here, click on “Add Post Feed”, this is where you need to connect everything. You can add Post Title, Content and Excerpt, but you don’t need to, however, I would recommend adding the post title. This can be made out of what the user has inserted into the fields. Click on the three dots to the right of the fields, here you can select what you want to go here, you can choose from the fields you have made the form, or you can choose the logged-in user’s name or user name (or another of other fields). You can do more than one. If you are creating posts for internal use to keep track of users, then it would be useful for the post title to be a mix of the user’s name or email + the data from one of the fields. Play around with it and see what works best for you.
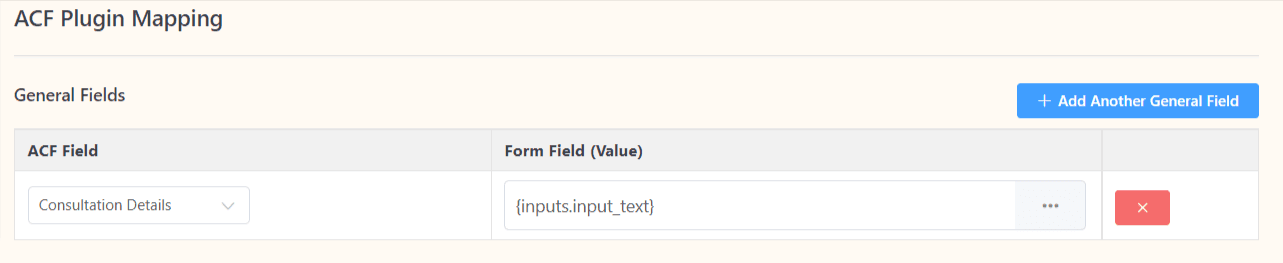
When you want to connect with an ACF field go to the “ACF Plugin Mapping” section. Click on the ACF Field and select one from the drop-down, here you can select one of the fields that you have made in ACF, and then next to it, you can connect it to one of the fields you have made in the form. In the example below you can see that I have connected the ACF field “Consultation Details” with the field “Input Text” on the form I’ve made. This means when the user has submitted the form, a post will be created and the field that is filled in will be Consultation Details, with the text they added to the form.
Once you have mapped out your fields, do a few test runs to make sure it’s all working correctly. Remember you can add more than one Value in each field. Make sure you save the Post Feed and the form. Once you have done that you have successfully connected your ACF to a form!
Some parts may have been confusing so feel free to ask questions in the comments and I’ll try and get back to you. If you need any help please get in touch via my contact page here.